> For the complete documentation index, see [llms.txt](https://docs.reefcloud.ai/llms.txt). Markdown versions of documentation pages are available by appending `.md` to page URLs; this page is available as [Markdown](https://docs.reefcloud.ai/collect/configure-your-surveys.md).
# Configure your surveys
Guide to using the "Sites" page to add and manage sites
When collecting images for surveys, it is important to record where, when, and how the data was collected (metadata). To help organise the data from surveys, ReefCloud considers three types of metadata: ***Sites, Surveys*** and ***Sampling Units.***
### Sites
***Sites*** are the individual locations where data are collected during the fieldwork. They represent a single point in space and capture a collection of sampling units (e.g., transects, random images, etc). In monitoring projects, a *Site* is often a fixed location that is routinely sampled over time. In this case, each sample period represents a survey for a given site.
When you add a new site, as well as a *Site Name*, *Latitude*, *Longitude* and *Depth* (required) there are options to add additional information that may help you group your data for analysis later.
To create a site, follow these steps:
1. From the *Projects* window, select the project you plan to work in.
2. Click on “Sites” from the left-hand ribbon menu. This will take you to the Sites page, listing your existing sites in the project and a map showing their location. As you populate your Sites with Surveys and Images, more information will appear in the table.
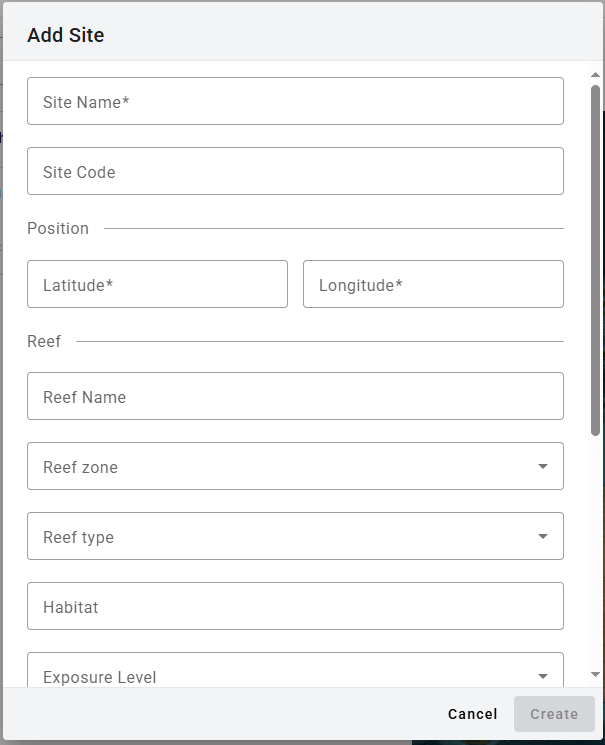
3. You can create a new individual site using the blue “Add Site” button at the top of the Sites page. This will bring up a pop-up window asking you to enter the following details:
1. *Site Name*: Customised name for your site. This must be unique. *If you choose to make your project public, your Site Name and location may appear on the* [*ReefCloud Public Dashboard*](/get-results/public-dashboard.md)*.*
2. *Site Code* \[Optional]: A short abbreviation of your Site name.
3. *Latitude*: Latitude coordinates in decimal degrees. Note that we use WGS84 as the reference datum.
4. *Longitude*: Longitude coordinates in decimal degrees. Note that we use WGS84 as the reference datum.
5. *Reef Nam*e \[Optional]: Sometimes multiple sites can be located across a single individual reef (e.g., Davis Reef). This field gives the option of capturing additional data to use in aggregating your results.
6. *Reef Zone* \[Optional]: Describes the typical zones of a reef: *back reef, crest, fore reef*, and *pinnacle.*
7. *Reef type* \[Optional]: Typical reef formations: *atoll, barrier, fringing, lagoon*, and *patch.*
8. *Habitat* \[Optional]: free field to add more information for help aggregating data.
9. *Exposure Level* \[Optional]: How exposed is this site to the regular weather (routine conditions): *Very Sheltered, Sheltered, Semi-sheltered, Exposed*.
10. *Depth*: the average depth at which you collect the images. *If you want to group multiple transects at different depths under the same Site GPS location (e.g., 5m transect, 10m transect and 12m transect all under "Site A"), you can put in a depth range here (e.g., 5-12m), and specify depths when you submit your transects as different surveys in the next step. Alternatively, you can submit each transect as a different site (e.g. Site Name = "Site A, 5m transect", "Site A, 10m transect").*
11. *Country* \[Optional]. This will be auto-populated from your Project Set Up, but you can change it.
12. *Country Region* \[Optional]: Specific region within the country of the collection (e.g., Great Barrier Reef, Koror State, etc).
13. *Local Region* \[Optional]: Within the country region, is there another subregion? (e.g., Northern Great Barrier Reef).
14. *Management* \[Optional]: Management regime (e.g., Open/Close to fisheries, No public access, etc).
Adding a new site in ReefCloud
4. Alternatively, if you have many sites to create at once, you can use the blue "Import Sites" button from the Sites page. This will allow you to fill in an Excel spreadsheet template to create your sites, all at once! Download the Template Spreadsheet as a .csv and populate it with your data. The only fields that are mandatory are the "Site Name", "Latitude", "Longitude" and "Depth". Upload your completed sites.csv file. Note that this will automatically update the Sites page table details.
Example sites.csv upload file
{% embed url="" %}
Five minute video tutorial on how to add and manage sites in ReefCloud.
{% endembed %}
### Surveys
***Surveys*** capture the time when a site was surveyed. Most monitoring programs will have multiple *Surveys* per *Site*, representing repeated sampling over time (e.g., annual surveys). Some Projects are designed for a single survey to capture spatial patterns only. In that case, each *Site* will only have a one *Survey* and it is important to record when that survey happened.
Surveys can be created using the “Create Survey” button from the Survey page or by bulk upload from a template file, following the prompts from the blue "Bulk Import" button. When importing surveys in bulk, you can also import their associated images. See [Upload images](/collect/upload-images.md) section for more details.
To create a new survey, follow these steps:
1. Click on “Surveys” tab from the left-hand ribbon menu. This will take you to the Surveys page, listing your all your surveys and associated metadata.
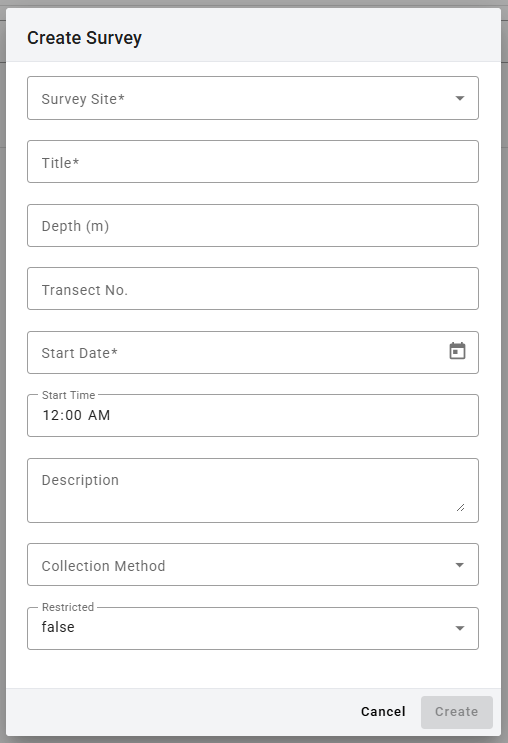
2. You can create a new individual survey using the blue “Create Survey” button at the top right of the Surveys page. This will bring up a pop-up window asking you to enter the following details:
1. *Survey Site*: Use the dropdown list to select the Site at which your Survey took place.
2. *Title*: Give your Survey a unique title that captures what the survey is sampling (in a way that is meaningful for you and your team): for example, you might put in the year if it is an annual survey, e.g., *Site A, 2024*, add the transect number if there are multiple transects per site e.g., *Site A, 2024, T1*, and/or the depth if you have multiple survey depths per site e.g., *Site A, 2024, 5m transect*.
3. *Depth* \[Optional]: Add the depth (in meters) your survey was conducted at.
4. *Date:* Select the survey date using the calender. If you are using the Bulk Import function, the date should follow the format dd/mm/yyyy.
5. *Description* \[Optional]: Free field to add more notes about your survey: perhaps the weather, or any disruptions or interesting findings.
6. *Collection method* \[Optional]: add from the dropdown list. This becomes useful if you have a mix of survey methods (e.g. some diving and some snorkelling surveys).
7. *Restricted*: in many circumstances, monitoring practitioners are happy for the bulk of their historic data to be shared but may want to keep recent survey data private until there's been a chance to analyse and explore results. This option allows you to restrict access to particular surveys while keeping the remainder of your project public. Click "true" if you'd like to keep this survey data private. For more information on privacy, see Privacy and Data Sharing information [here](/frequently-asked-questions/privacy-data-sharing-and-permissions.md).
{% hint style="info" %}
#### ReefCheck data import feature
[ReefCheck](https://www.reefcheck.org/) is a non-profit organisation that has been training and organising teams of local volunteer citizen scientist divers to collect information on coral reef health since 1997. ReefCloud has teamed up with the ReefCheck Foundation's global network of reef surveyors to support inclusion of ReefCheck data. We've added a blue "ReefCheck Import" upload button on the top right of the *Surveys* page that allows submission of standard site description, invertebrate belt and substrate line intercept transect ReefCheck datasheets. Please only use this button if you are following the [ReefCheck EcoDiver Program](https://www.reefcheck.org/tropical-program/about-ecodiver/) protocols. We are working on a way to share data back to ReefCheck’s global database: until then please also submit datasheets online to ReefCheck.
{% endhint %}